
TidyCal Settings
Manage your TidyCal account in Settings: Profile, Preferences, Bookings, Account, Trusted devices, Custom domain, Your plan, and Themes — on every plan.
To access Settings, click Settings in the left sidebar navigation, or go directly to tidycal.com/settings.
Settings Navigation
Settings uses a sidebar layout with eight sections. Click any item to navigate directly:
- Profile — Name, email, profile picture
- Preferences — Timezone, time format, currency, language, spam protection (reCAPTCHA)
- Bookings — Who pays the platform fee, holding a slot when a payment is declined, your own booking reminder emails
- Account — Delete account
- Trusted devices — Device verification, manage trusted devices
- Custom domain — Use your own domain for your booking page
- Your plan — Plan info, upgrade, downgrade, refund, purchase history
- Themes — View and manage booking page themes
To customize your public booking page, use the Booking page screen in the sidebar (a separate sidebar item, not a Settings section) — see Bookings page below.
All Settings pages are available on every plan (Free, Individual, Pro, and Agency). Some features within sub-pages vary by plan.
Profile
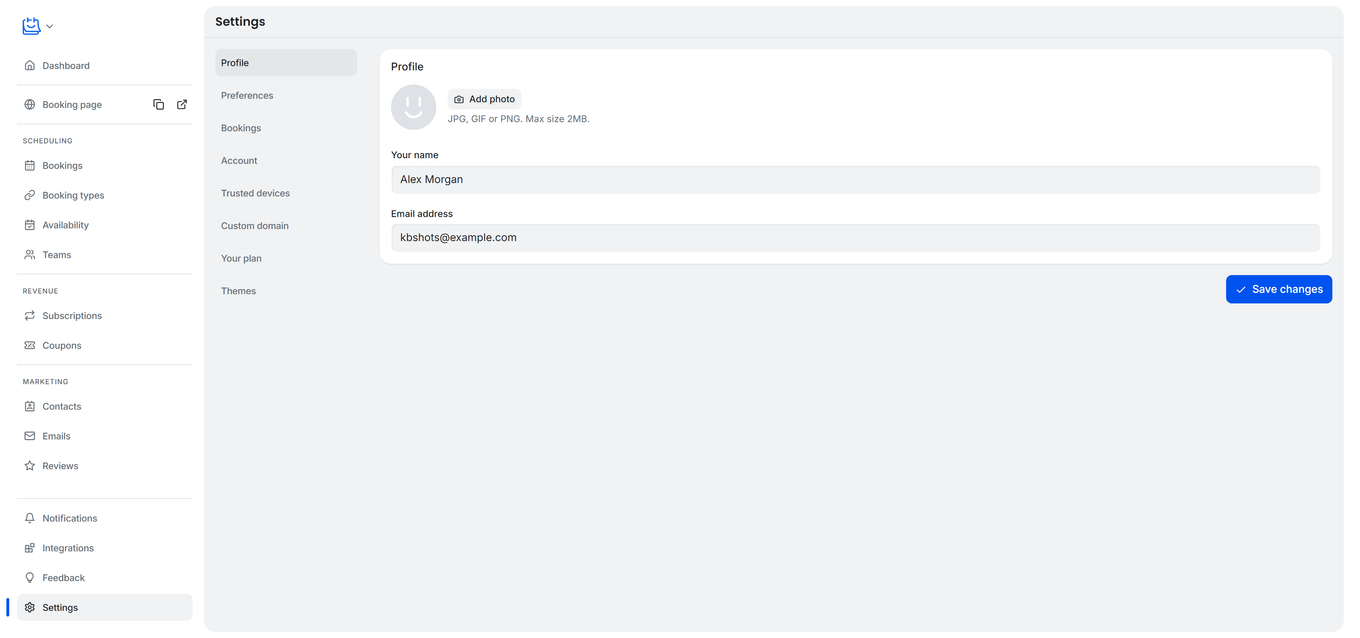
Go to Settings → Profile to update your personal information.
Profile Picture
Upload a profile picture that appears on your booking page and booking types. Click Add photo (or Change photo if you already have one) to upload an image.
- Accepted formats: JPEG, PNG, GIF, BMP, WebP
- Max file size: 2 MB
Note: This image is for your TidyCal booking pages.
Your Name
The name displayed on your TidyCal booking page and booking types. Booking confirmation, reminder, cancellation, and reschedule emails also show this name as the sender (on team bookings, the assigned host’s name).
Email Address
Your TidyCal account email. This is used for:
- Logging in to your account
- The Reply-To address on booking confirmation, reminder, cancellation, and reschedule emails, unless a booking type sets its own reply-to address. These emails are sent from TidyCal’s own address, using your name.
Note: Calendar invitations work differently. If a booking type’s Confirmation method is set to Calendar invitation, the booking is added to your connected calendar with your booker as a guest, so the invitation is sent through that calendar account rather than from TidyCal’s email address.
If your account uses Google Sign-In, you’ll see a “Connected with Google Sign-In” indicator below your email.
Changing your email is not applied straight away: TidyCal sends a confirmation link to the new address, and the change takes effect when you click it. If your account uses Google Sign-In, you set a password when confirming, and Google Sign-In is disconnected from your account. See How to change your TidyCal account email or password.
Click Save changes when done.
Preferences
Go to Settings → Preferences to configure timezone, time format, currency, language, app appearance, and spam protection (reCAPTCHA).

Timezone
Set your account timezone using the searchable dropdown. Start typing to filter — search by city name, timezone abbreviation, or UTC offset (e.g., “Los Angeles” or “London”). Abbreviations and offsets follow daylight saving time, so searching by city is the most reliable.
TidyCal automatically detects your visitors’ browser timezone, so booking times are shown in their local time and converted to yours.
Time Format
Choose between:
- 12 hour (e.g., 2:30 PM)
- 24 hour (e.g., 14:30)
A live preview displays your current local time in both formats, updating in real-time so you can see exactly how times will appear.
Currency
Set your account’s default currency for paid bookings. New booking types start with this currency, but each booking type has its own currency, chosen next to its price in the Pricing & Subscriptions tab. Changing this setting does not change the currency already set on your existing booking types.
Use the searchable dropdown to find your currency — search by currency name, code (USD, EUR, GBP), or symbol ($, €). Each option shows the symbol, full name, and code (e.g., “$ US Dollar (USD)”).
If your currency isn’t listed, contact support@tidycal.com to request it.
Language
Change the language of all your public-facing booking pages. Available languages are listed alphabetically.
- The booking calendar’s first day of the week follows the selected language’s locale
- Your TidyCal admin interface remains in English
Appearance (Light, Dark, or System)
Choose how the TidyCal app looks to you. Under Appearance, select one option:
- Light — the standard light interface
- Dark — a dark interface
- System — follows your device's light or dark setting
Picking an option previews it right away, but it is only stored when you click Save changes — if you leave the page without saving, it reverts to your previous setting.
This changes the TidyCal app only. It does not affect how your public booking page looks to clients — booking page colors and dark mode are set separately in the Booking Theme Editor.
Spam Protection (reCAPTCHA)
Enable or disable Google reCAPTCHA to prevent spam bots from submitting fake bookings. Select Enabled from the dropdown to activate protection.
Learn more: How to Enable Bot Protection with reCAPTCHA
Click Save changes when done.
Bookings
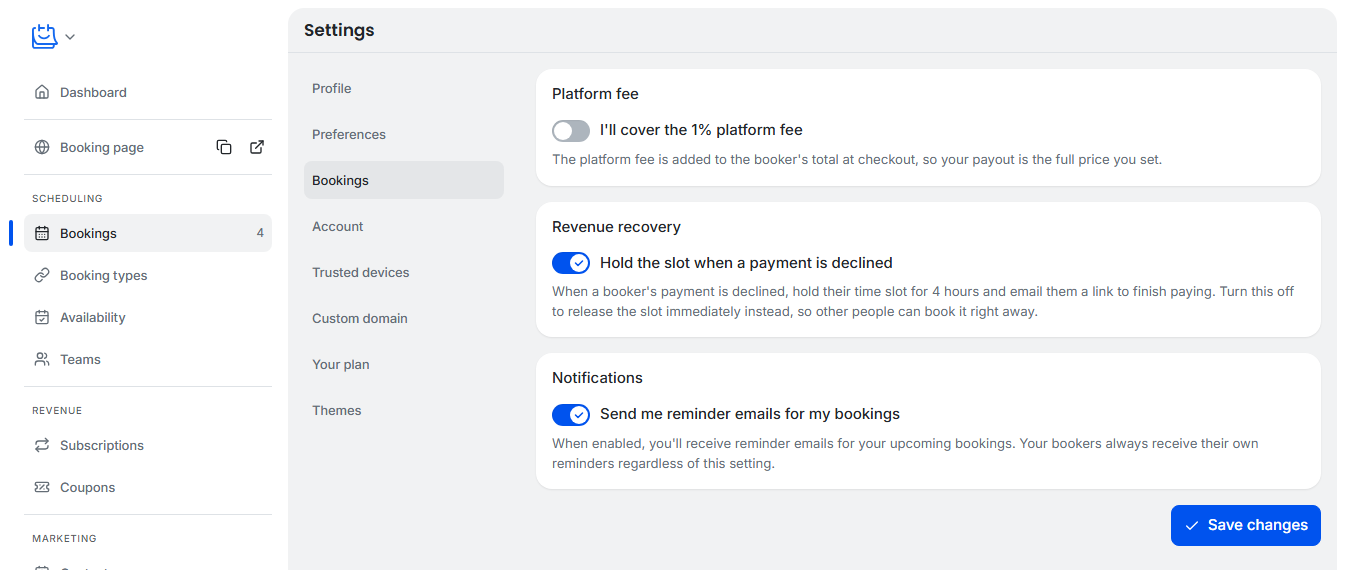
Go to Settings → Bookings to control how TidyCal handles payments on your bookings. This page has three cards.
Note: Settings → Bookings (/settings/bookings) is a different page from the Booking page screen described in Bookings page below. This page covers payment behavior; the /settings/bookings-page path redirects to /dashboard/booking-page and covers how your public page looks.
Platform fee
Sets who covers TidyCal's 1% platform fee on your paid Stripe bookings.
- By default the fee is added to your booker's total at checkout, so your payout is the full price you set.
- On Individual Lifetime and Agency Lifetime, you can switch on I'll cover the 1% platform fee to absorb it yourself instead. Your bookers then pay only the price you set, and the fee comes out of your payout.
- On the Free Plan the toggle is visible but locked, marked with a Lifetime badge.
- On Pro there is no platform fee to assign, so the page says so instead of showing a toggle.
This is an account-level setting — it applies to all of your paid bookings, not per booking type. For how the fee works, see Does TidyCal charge a fee on payments?
Revenue recovery
Hold the slot when a payment is declined is on by default and available on every plan.
- When it is on and a booker's payment is declined, TidyCal keeps their time slot reserved for 4 hours and emails them a link to finish paying. The slot stays blocked to other bookers for that window.
- When it is off, the slot is released immediately so someone else can book it.
Notifications
Send me reminder emails for my bookings is on by default and available on every plan.
- When it is on, you receive a reminder email before each of your upcoming bookings.
- When it is off, you stop receiving your own reminders. Your bookers always receive their own reminders regardless of this setting.
- On team booking types each host controls their own inbox, so one host opting out does not affect the other hosts or the guest reminder.
This setting used to live under Settings → Preferences. It moved to Settings → Bookings in August 2026.
Click Save changes to apply changes on this page.
Bookings page
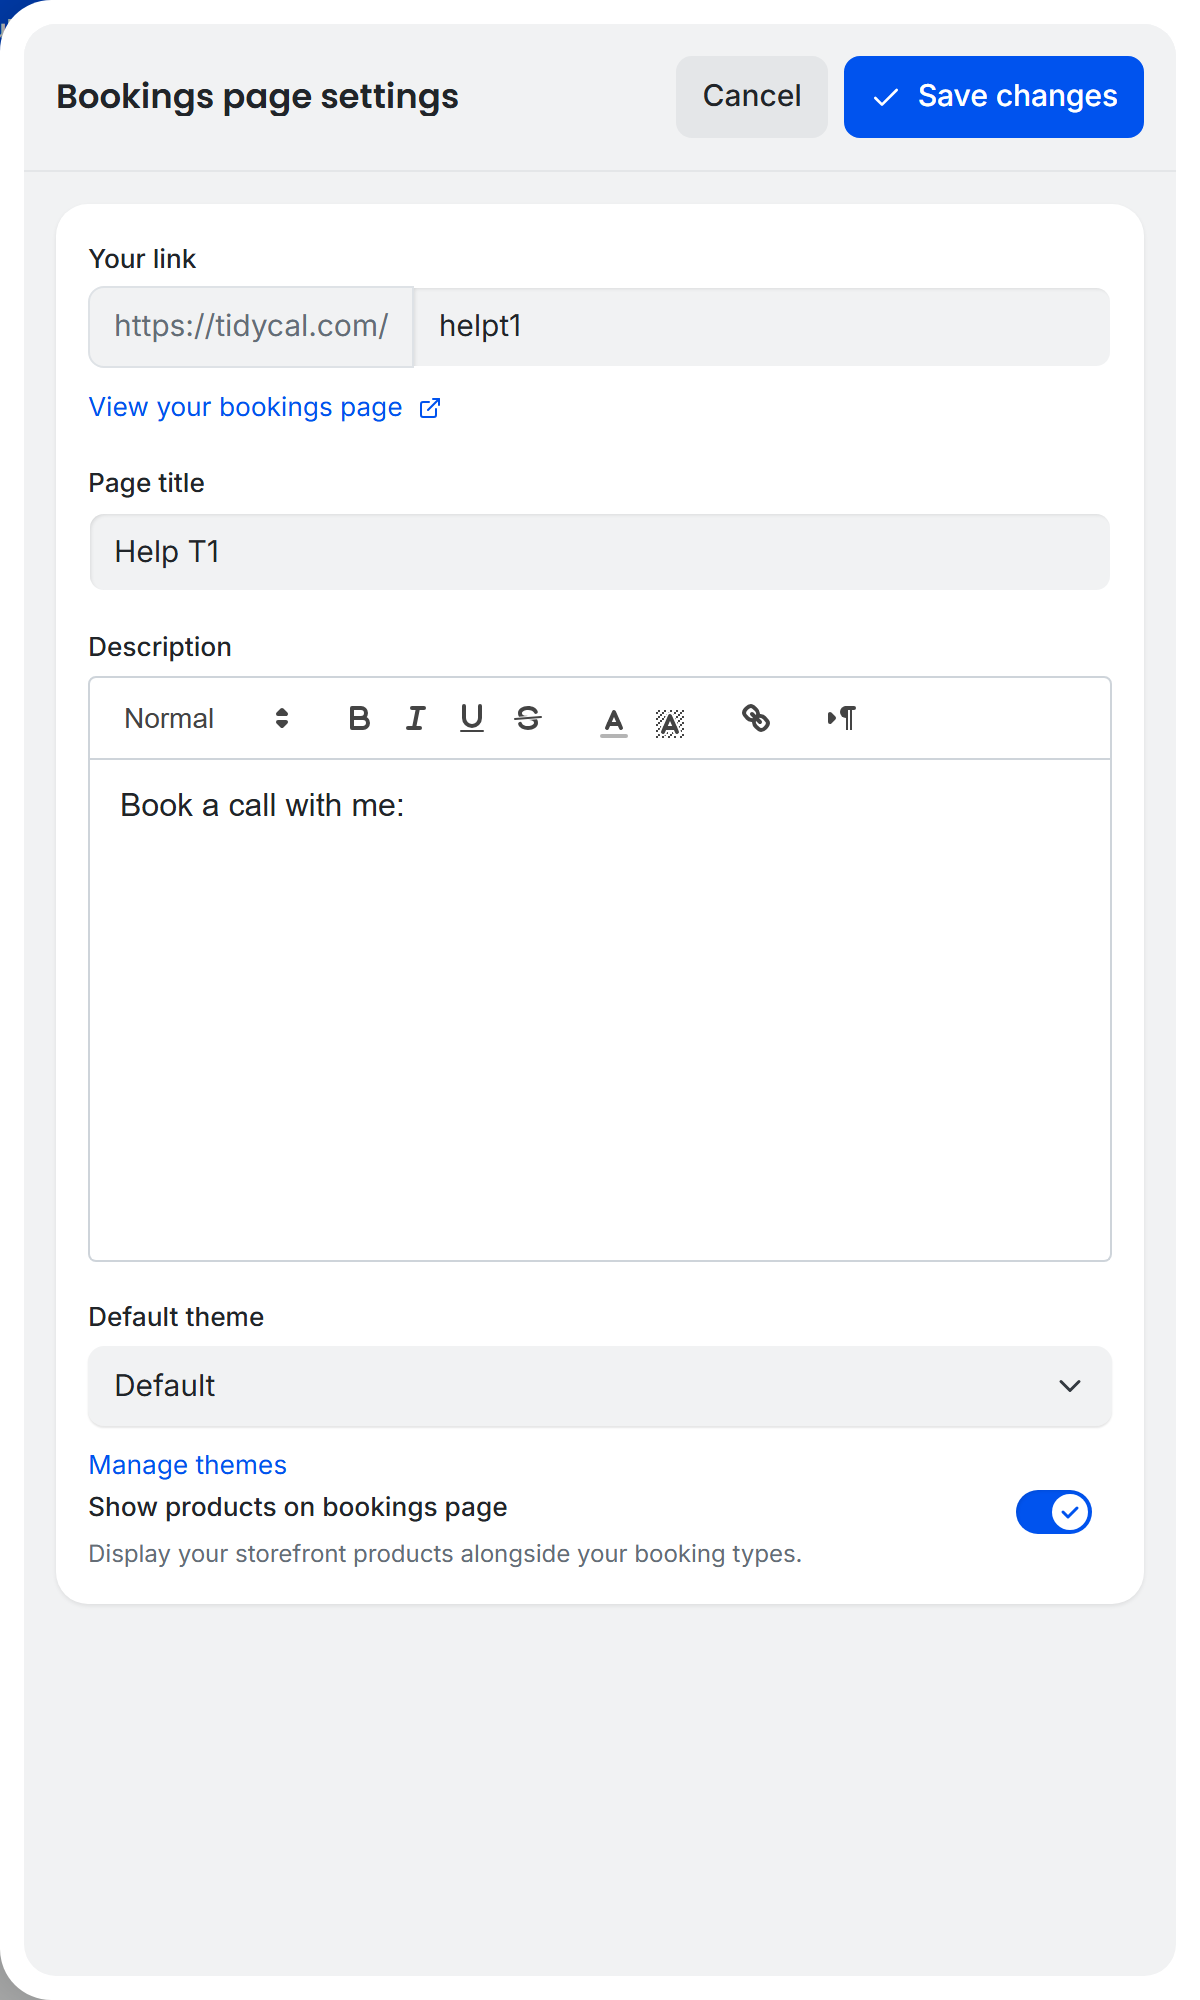
Customize your public booking page from the Booking page screen. Click Booking page in the sidebar, then click the Classic card to open the settings drawer. The drawer contains your Your link URL, page title, description, default theme, and a toggle to show storefront products on your booking page.
Note: booking page settings moved from /settings/bookings-page to /dashboard/booking-page (old links still redirect). Language and spam protection (reCAPTCHA) now live under Settings → Preferences.
Your Link
Set a custom URL path for your booking page. For example, entering dentalsurgeonaustin creates the URL: https://tidycal.com/dentalsurgeonaustin
Choose something memorable and professional for your clients.
Page Title
The title displayed at the top of your booking page (e.g., “Schedule a meeting”).
Description
Add a description to your booking page using the rich text editor. You can format text with bold, italic, links, and more. The default text is “Book a call with me:”
Default Theme
Select a theme to customize the look of your booking pages. Choose from themes you’ve created, or select “No theme selected” for the default appearance. Click Manage themes to go to the Themes page.
Learn more: How to use the Booking Theme Editor
Show Products on Bookings Page
Turn on Show products on bookings page to display your Digital Storefront products alongside your booking types on your public booking page.
Click Save changes when done.
Account
Go to Settings → Account to manage account deletion.
Delete Account
Free Plan users:
- Click the Delete account button
- Confirm in the dialog that appears
- You’ll receive an email with a confirmation link to complete the deletion
This action is permanent and cannot be undone.
Individual Plan, Pro, and Agency Plan users:
Because you have a paid account, account deletion must be handled by our support team. Contact support@tidycal.com to request account deletion.
Trusted devices
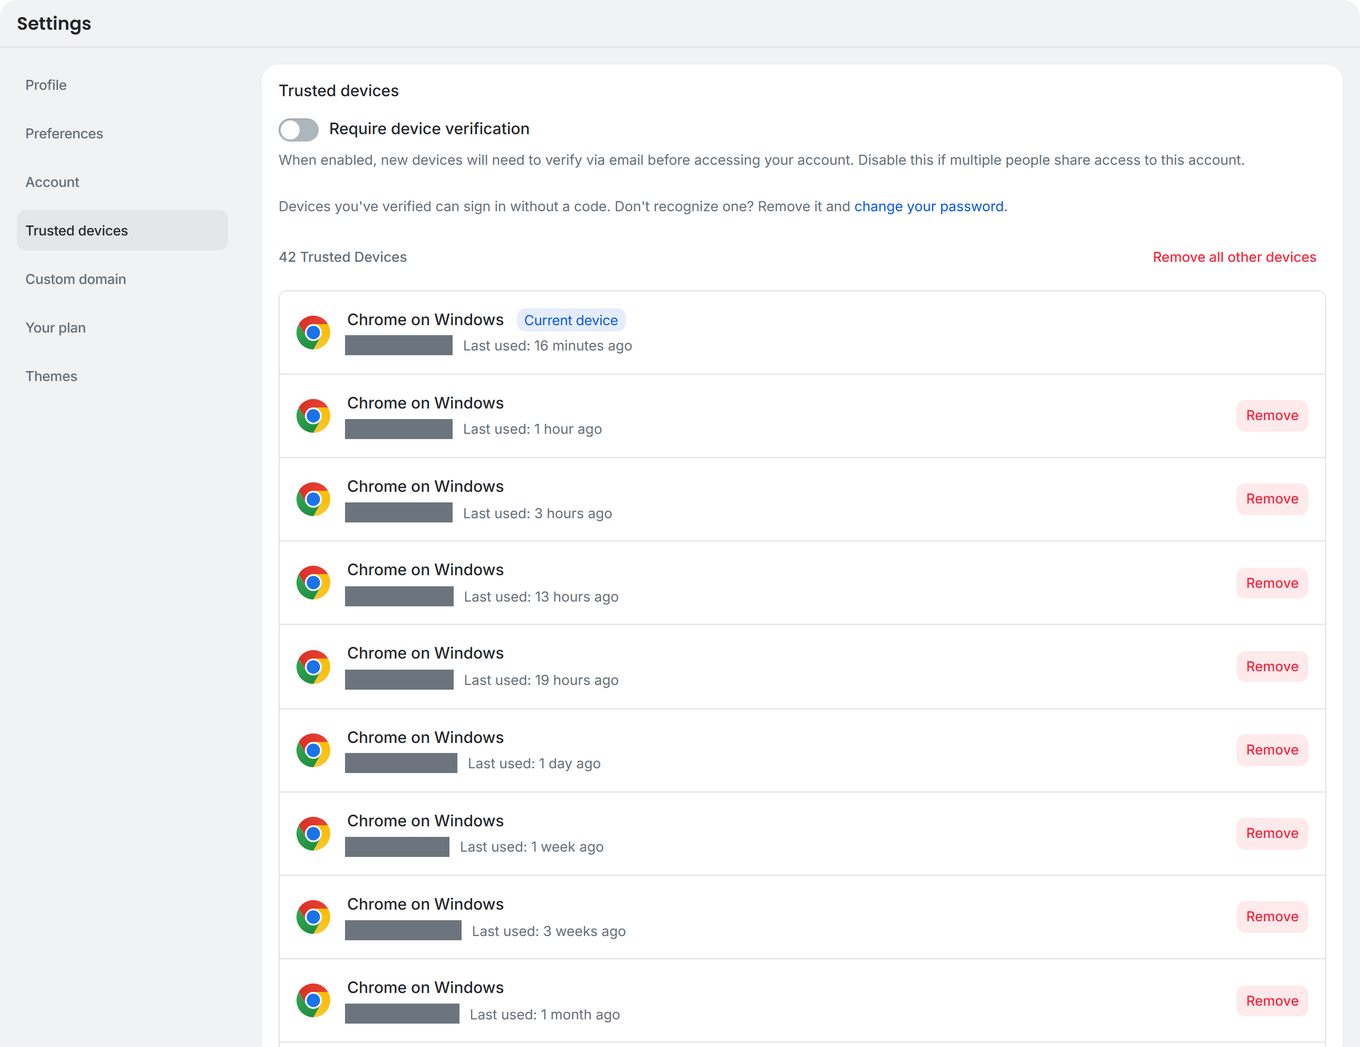
Go to Settings → Trusted devices to manage device verification and view your trusted devices.
Require Device Verification
When enabled (the default), new devices must verify via email before accessing your account. Toggle the Require device verification checkbox to enable or disable this feature.
Disable this if multiple people share access to this account. Click Save changes to apply.
Manage Trusted devices
View all verified devices with details including:
- Browser icon (Chrome, Safari, Firefox, or generic)
- Device name with a “Current device” badge for the one you’re using now
- IP address
- Last used or Verified timestamp
To remove a single device, click Remove next to it. To remove all other devices at once, click Remove all other devices (requires password confirmation for password-based accounts).
Learn more: Trusted devices – Account Security
Custom domain
Go to Settings → Custom domain to connect your own domain or subdomain to your TidyCal booking page.
Instead of sharing tidycal.com/your-username, you can use a custom URL like schedule.yourbusiness.com. TidyCal handles DNS verification and domain resolution automatically.
Plan requirement: Pro, or Agency Lifetime purchased before September 1, 2026. Agency Lifetime purchased on or after that date does not include a custom domain — subscribe to Pro to add one. (Legacy Individual Lifetime customers who purchased before April 2026 also retain access.) Accounts without access, including the Free Plan, see an Unlock custom domain by upgrading button instead.
For full setup instructions including DNS configuration, see: Custom domains – Use Your Own Domain for Booking Pages
Your plan
Go to Settings → Your plan to view your current plan, upgrade, downgrade, or request a refund.

Current Plan
The heading shows Your plan: followed by your plan — Free, Individual Lifetime, Agency Lifetime, or Pro (Monthly) / Pro (Yearly). If you hold a lifetime plan and a Pro subscription, both are shown, for example Individual Lifetime + Pro (Monthly). If you’re on a trial, the trial’s name is shown in brackets after the plan name.
Plan Features
Individual Lifetime, Agency Lifetime and Pro accounts see a Your plan includes: list. Accounts without a Pro subscription also see what Pro adds — Upgrade to Pro to get: on the Free Plan, and Subscribe to Pro to get: on a lifetime plan.
Upgrading
If you don’t have a Pro subscription, the page shows a Subscribe to Pro button, which opens the pricing page:
- Free Plan users: choose Pro ($12/month or $99/year, recurring subscription via TidyCal), Individual Lifetime ($29 one-time, via AppSumo), or Agency Lifetime ($79 one-time, via AppSumo)
- Individual Plan users: subscribe to Pro for booker-side branding removal and team features. Upgrading to Agency Lifetime is done through AppSumo.
- Agency Plan users: subscribe to Pro on top of your Agency Lifetime to remove all TidyCal branding from booker pages. On Agency Lifetime purchased on or after September 1, 2026, Pro also removes the calendar, team-member and SMS limits and adds a custom domain.
Pro subscriptions are purchased on tidycal.com via Stripe. Lifetime upgrades are purchased via AppSumo. For the full upgrade decision tree, see Upgrading Your TidyCal Plan.
Downgrading and Refunds
If you bought a lifetime plan directly on tidycal.com within the last 60 days, the page shows:
- Downgrade to Individual Lifetime — from Agency Lifetime (partial refund)
- Request full refund — reverts your account to the Free Plan
Both options include an optional feedback form. Refunds are processed to your original payment method.
Warning: Downgrading or refunding removes access to higher-tier features immediately.
Pro subscriptions: Cancel anytime from the Stripe Customer Portal via Manage subscription. You can request a full refund within 7 days of your subscription purchase; after that, subscription payments are non-refundable, though cancelling still keeps your access through the end of the current billing period. See How do I get a refund for my TidyCal plan? for the full policy. Lifetime plans bought on AppSumo are refunded through AppSumo.
Purchase History
If you bought a lifetime plan directly on tidycal.com, a Purchase history table shows:
- Date of each transaction
- Plan name
- Action (Purchase, Upgrade, Downgrade, or Refund)
- Refundable until date (60 days from purchase)
- Amount
- Invoice link (View)
Themes
Go to Settings → Themes to view and manage your booking page themes.
This page displays all your themes in a table showing:
- Name — the theme’s name
- Color palette — Visual preview of primary and background colors with hex codes
- Actions — Delete button to remove a theme
Important: Themes are created from individual booking type pages, not from this Settings page. The Themes page is for viewing and deleting existing themes.
To set the default theme for your booking page, click Booking page in the sidebar, click the Classic card, and choose a Default theme — see Default Theme above.
Learn more: How to use the Booking Theme Editor
Website Builder
TidyCal includes a built-in landing page builder. Access it from Booking page in the sidebar (directly below Dashboard, with a globe icon). Switch between Classic and Website modes. Learn how to create your TidyCal Website.
Troubleshooting
Changes Not Saving
Make sure you click Save changes at the bottom of the Profile, Preferences, Bookings, and Trusted devices pages (on Custom domain the button is Save). Each page has its own save button — changes on one page don’t affect others. Account, Your plan, and Themes have no save button.
Timezone Appears Wrong
If your booking times seem off, go to Settings → Preferences and verify your timezone is correct. Use the searchable dropdown to find the exact timezone for your location.
Can’t Delete Account
If you’re on a paid plan (Individual Lifetime, Pro, or Agency Lifetime), the delete button is disabled. Contact support@tidycal.com to request account deletion.
Profile Picture Upload Error
Ensure your image is under 2 MB and in a supported format (JPEG, PNG, GIF, BMP, or WebP). If you see We could not save your photo. Your previous photo is unchanged - please try again., the upload could not be stored and your old photo was kept — try uploading it again.
Frequently Asked Questions
How do I access Settings?
Click Settings in the left sidebar navigation, or go to tidycal.com/settings.
Are any Settings restricted by plan?
All eight Settings pages are accessible on all plans (Free Plan, Individual Lifetime, Pro, and Agency Lifetime), but some options inside them depend on your plan: connecting a custom domain, choosing who covers the platform fee, and account deletion (Free Plan users can self-delete, while paid plan users must contact support).
Can I change my currency after setting it?
Yes. Go to Settings → Preferences and use the searchable currency dropdown to select a different default currency. This is the currency new booking types start with; it does not change the currency already set on your existing booking types. To change the currency of an existing booking type, open it and pick the currency next to its price in the Pricing & Subscriptions tab.
How long do I have to request a refund?
It depends on how you bought your plan:
- Lifetime plan bought directly on tidycal.com: refund or downgrade from Settings → Your plan within 60 days of purchase. After that, the buttons no longer appear.
- Pro: a full refund within 7 days of your subscription purchase.
- Lifetime plan bought on AppSumo: refunded through AppSumo.
See How do I get a refund for my TidyCal plan?.