
Configure Calendars for 2-Way Sync
TidyCal Calendar Configuration: Step-by-Step Guide
This guide shows you how to configure your external calendars—Microsoft 365, Apple iCloud, and Google Workspace—for two-way synchronization with TidyCal, so it accurately reads your availability and writes new bookings without double-bookings.

Important General Notes on Calendar Configuration
Calendar data often includes sensitive personal or business information. For privacy and security, app developers must follow regulations that require user-initiated authorization. This ensures that only you can control which apps access your calendar.
🔑 Permissions are Key
The initial authorization process is the most critical point for granting permissions. For TidyCal to have 'edit' and 'share' capabilities, you must approve its requests for calendar access, which includes viewing and modifying events.
🔄 Review and Revoke
You can review and revoke app permissions at any time through your respective calendar account's privacy settings.
🛡️ Administrator Management
If your calendar accounts are managed by an Administrator (e.g., a work or school account), the configuration may need to be performed by them through an Admin account. Policies may restrict third-party app access, so you might need to contact your IT department.
🗓️ Synced Events
TidyCal does not sync with calendars that you have subscribed to or with shared calendars. Ensure your calendar event is added to a calendar that is integrated with TidyCal and enabled for reading. Events set to 'Free' in your external calendar are ignored by TidyCal.
This guide provides detailed, step-by-step instructions to properly configure your external calendars (Microsoft 365, Apple iCloud, and Google Workspace) for seamless two-way synchronization with TidyCal. Following these steps precisely is crucial to ensure TidyCal accurately reads your availability and writes new bookings, preventing double-bookings and keeping your schedule perfectly up-to-date.

1. Configuration for Microsoft 365 (Outlook 365)
To enable third-party applications such as TidyCal to efficiently manage your Outlook 365 calendar, it is essential to provide the necessary permissions. This mainly includes granting access to view, edit, and share your calendar details.
The procedure may vary slightly based on whether you are connecting a personal account or if you belong to an organization that has an IT administrator.
For Individual Users: Granting Initial Permissions
When you first integrate TidyCal with your Outlook 365 account, you will be prompted to authorize its access.
- Initiate the Connection from TidyCal:
- Log into TidyCal.
- Click the menu icon (usually a sidebar) at the top left.
- Navigate to Integrations > Calendars.
-
Click Add Microsoft 365 account.
- Microsoft Sign-in and Permission Request:
- You will be redirected to a Microsoft sign-in page.
-
After entering your credentials, a permission screen will appear detailing what TidyCal is requesting access to.
- Review and Accept Permissions:
- Carefully review the requested permissions. For TidyCal to function correctly, it will need permissions such as:
- View your calendar: To see your existing appointments and block out busy times.
- Edit your calendar: To create new events (bookings) and make changes if a booking is rescheduled or canceled.
- Have full access to your calendars: This often includes the ability to share calendar information, which is essential for TidyCal to display your availability to others.
- Sign you in and read your profile: Basic permissions required for the connection.
-
To ensure full functionality, you must accept these permissions. If unsure what was granted, disconnect your Outlook in TidyCal and re-integrate it.
Set as Primary (in TidyCal):
- Once connected, select a calendar from your Microsoft 365 account and click Set primary (required for bookings to be added).
- This allows TidyCal to read busy times from your connected calendar and create new events when bookings happen.
- Carefully review the requested permissions. For TidyCal to function correctly, it will need permissions such as:
For Individual Users: Verifying and Managing Existing Permissions
If you have already connected TidyCal and are experiencing issues, you can review and manage the permissions you've granted.
-
Access Your Microsoft Account Settings: Log in to your Microsoft account at account.microsoft.com.
-
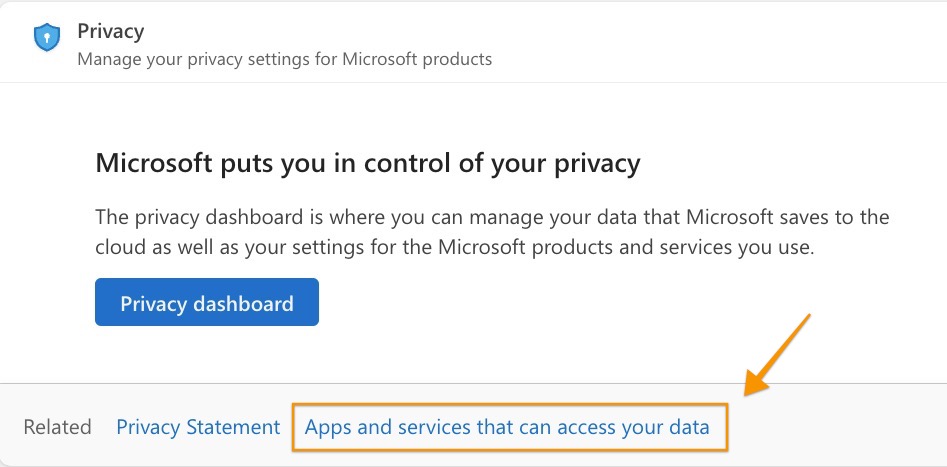
Go to the Privacy tab at the top of the page, or click here.
-
If the shortcut to Apps and Services that can access your data appears, click it
-
If it doesn't, click Privacy dashboard then App Access.
-
Review TidyCal's Permissions: Locate TidyCal in the list of applications. Click on it to see the permissions you have granted.
- Revoke and Re-authorize if Necessary: If you suspect the permissions are incorrect or incomplete, you can "Remove these permissions." After revoking access, go back to your TidyCal account and reconnect your Outlook Calendar. This will re-initiate the authorization process, allowing you to grant the correct permissions.

For Users within an Organization (Work or School Accounts)
If you are using a work or school Outlook 365 account, your organization's IT administrator may have policies that restrict third-party app access. If you are unable to grant permissions to TidyCal, you may need to contact your IT department.
Administrators can manage these settings through the Microsoft 365 admin center:
- User Consent Settings: The administrator can configure whether users are allowed to grant consent to third-party applications. This is managed in the Microsoft 365 admin center under Settings > Org settings > User consent to apps.
- Admin Consent: For certain applications, an administrator can grant consent on behalf of all users in the organization. This is done through the Microsoft Entra admin center (formerly Azure Active Directory admin center) under Enterprise applications.
- They can find TidyCal in the list of applications and grant the necessary permissions.

2. Configuration for Apple iCloud / iCal
Here are the steps to ensure that your iCloud calendar syncs events with TidyCal. Please follow all the steps below without skipping any of them to ensure a two-way sync.
Step 1: Adjust Apple Device Settings
- On your Apple device, navigate to System Settings.
- Select Internet Services.
- Disable Advanced Data Protection: Ensure this is OFF. When enabled, web access to your data at iCloud.com is automatically disabled. As TidyCal is a web-based service, it may not be able to access your calendar data if this is on.
- Enable Access iCloud Data on the Web: Ensure this is ON. If web access is disabled, your iCloud calendar won't be accessible on the web and therefore cannot be integrated with TidyCal, which relies on web access for its integrations.
Step 2: Configure Your iCloud Calendar (within the Calendar App)
- Launch your iCloud Calendar application on your device.
- Identify the specific calendar you wish to share with TidyCal (e.g., your "Work" calendar or a dedicated "TidyCal" calendar).
- Ensure this same calendar is enabled for reading in your TidyCal Integrations and is set as your Primary Calendar within TidyCal.
- Right-click on your target calendar and select Get Info.
- Ensure Ignore Alerts is unchecked.
- Click Calendar Info.
Step 3: Adjust Calendar App Settings
-
In the Calendar application, go to the General Tab.
Set your Default calendar app to Apple's Calendar App.
Go to the Accounts tab.
Check Enable this account.
Toggle the dropdown for Refresh calendars and set it to Push.
- Note: This setting aims to improve sync frequency, but as of current information, iCloud calendar updates can still take 30-45 minutes to sync with TidyCal.
- Exit the window.
- Click OK on the Info window to apply the changes.
👉 (Required) If your TidyCal email address doesn't match that of your external calendar's
Step 4: Share Your Calendar
- Right-click on the target calendar one more time.
- Click Share calendar.
- In the "Share with" field, enter the email address associated with your TidyCal account.
- Press Tab on your keyboard or click Done.
- If you clicked Done, right-click on the calendar again and select Save settings.
- Hover your mouse over the email address you just added and click the down arrow to reveal the dropdown menu.
- Ensure that View and Edit is checked.
- Click Done.
Step 5: Accept the Invitation
- Go to your email inbox and look for an email from iCloud (check spam/junk folders if you don't see it).
- Accept the invitation to share. You may be prompted to log into your iCloud on a web browser; complete the login to finalize the process.

3. Configuration for Google Workspace
For Google Workspace users, an Administrator must enable key services and sharing permissions from the Admin Console. This allows TidyCal to access calendars and automatically create Google Meet links for your bookings.
Requirements:
- In TidyCal, use your Google Workspace email as your TidyCal Email Address.
- In TidyCal, you must integrate your Google Workspace account and set a Primary Calendar from it.
- You must have Administrator access to the Google Admin console. If you don't, please pass these requests below to your Administrator.
- Google Workspace Calendar must be enabled.
- Google Meet must be enabled.
Step 1: Enable Google Calendar (in Google Admin Console)
-
Login to Google Admin Console.
Navigate to APPS > Google Workspace.
Click Calendar
Set Status to "ON for Everyone".
Under Sharing Settings:
- Double-click External sharing options for primary calendars.
-
Select Share all information, and allow managing of calendars.
This provides both READ and WRITE permissions for TidyCal.
- Save your changes.
Step 2: Enable Google Meet (in Google Admin Console)
-
In the Google Admin Console, navigate to APPS > Google Workspace > Calendar
Double-click Video Conferencing.
Enable these options:
- Make Google Meet the default video conferencing provider when available.
- Automatically add meeting or video conference links when users create events.
- Save your changes.
- Then, click on Google Meet (under Google Workspace apps) and ensure its Status is also set to "ON for Everyone".
If you encounter any issues or have further questions after following these steps, please reach out to our support team at support@tidycal.com . We're here to help!
NEXT: Online Video Conferences
Frequently Asked Questions
What does 2-way sync mean?
2-way sync means events created in TidyCal appear on your external calendar, and events on your external calendar block time in TidyCal.
Which calendar providers support 2-way sync?
Google Calendar, Microsoft Outlook/365, and Apple Calendar.