
Availability Schedules in TidyCal
Availability schedules in TidyCal set the hours clients can book: weekly hours plus date overrides. Create them on any plan and assign them to booking types.
To manage your schedules, click Availability in the sidebar or go to tidycal.com/dashboard/availability. All plans (Free Plan, Individual Lifetime, Agency Lifetime and Pro) can create unlimited schedules.
How does availability work in TidyCal?
A schedule sets the hours you are open to bookings. TidyCal then removes any time that is already taken, so clients only see slots you are actually free for:
- Your schedule’s weekly hours and date overrides set when you can be booked.
- Busy events on your connected calendars and your existing TidyCal bookings block the times they cover.
- The remaining time is split into slots that fit the booking type’s duration.
A calendar event blocks time only when it is on a calendar with Reading enabled and is marked busy; events marked Free do not block. A calendar account that has needed reconnecting for more than 30 days stops blocking time, and a booking type with Ignore external calendar conflicts. turned on skips calendar events entirely. See calendar reading settings for how to turn reading on.
Booking type restrictions remove more slots: minimum booking notice, buffers between bookings, how far in advance clients can book and booking limits.
What does the Availability page show?
The Availability page lists each schedule as a card. Each card shows:

- Schedule name, with a blue Default badge on your default schedule
- Your timezone: schedule hours are in your account timezone (see time zones in TidyCal)
- Weekly hours for each day; days without hours show Unavailable
- Available dates and Date overrides: the upcoming dates you opened or blocked, grouped into ranges such as Jul 10 → Jul 24
- Add date override: a shortcut that opens the editor (not shown on Specific dates schedules)
Click Edit (or anywhere on the card) to open the schedule editor. The three-dot menu offers:
- Set as default: not shown on the current default
- Duplicate: creates a copy with “(Copy)” added to the name
- Delete: not shown on the default schedule
How do I create a new availability schedule?
- Click Availability in the sidebar.
- Click New schedule. The New schedule drawer opens.
- Enter a name in Availability title. Each schedule in your account needs a different name.
- Under Availability type, keep Weekly for hours that repeat every week, or choose Specific dates (covered below).
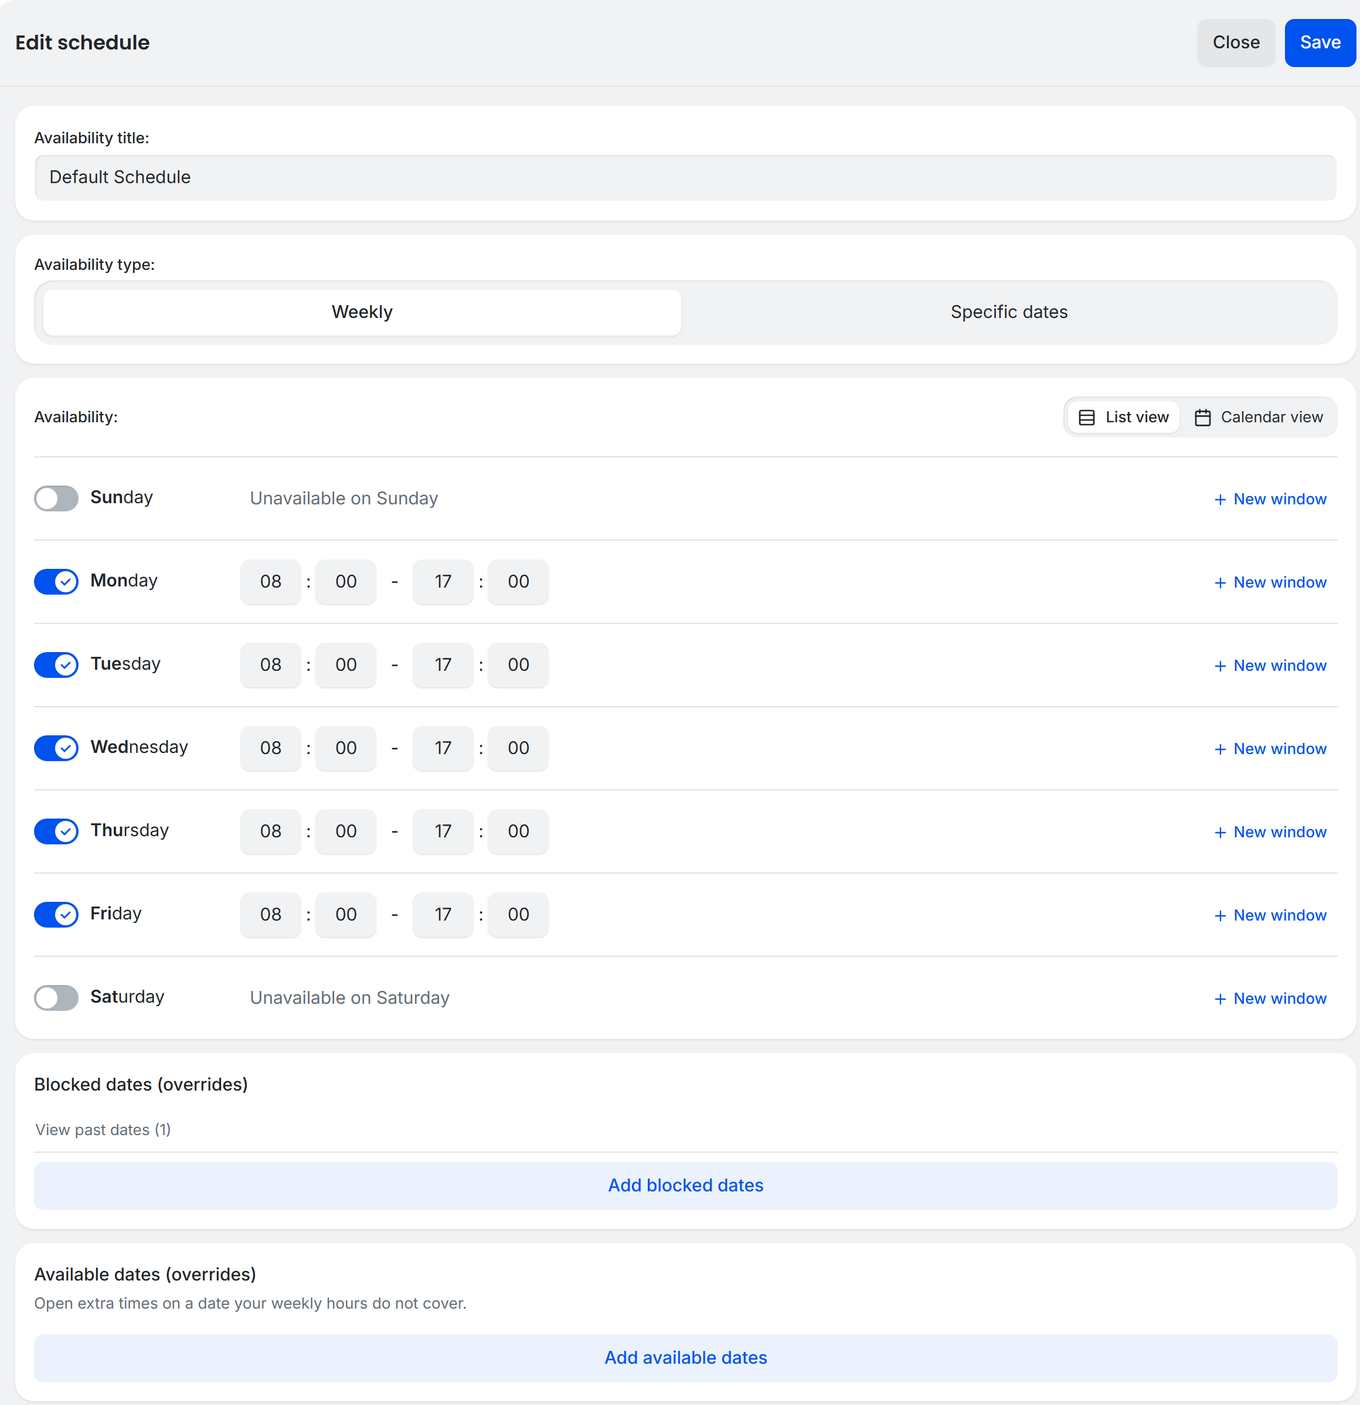
- Set your weekly hours: turn each day on or off, choose start and end times from the hour and minute dropdowns, and click New window to add another time range on the same day. A new schedule starts with Monday to Friday, 8:00am to 5:00pm.
- Optionally add blocked dates or available dates (see date overrides below).
- Click Save.
The new schedule appears on the Availability page. It does not become your default unless you set it as default.
How do I edit a schedule?
- Click Edit on the schedule card, or click anywhere on the card.
- In the Edit schedule drawer, change the name, weekly hours or date overrides.
- Click Save.
Changes apply to every booking type that uses the schedule as soon as you save. Clicking Apply in a date picker does not save on its own. If you click Close with unsaved changes, TidyCal asks Save changes before closing? and offers Discard changes, Cancel and Save.
What is the difference between List view and Calendar view?
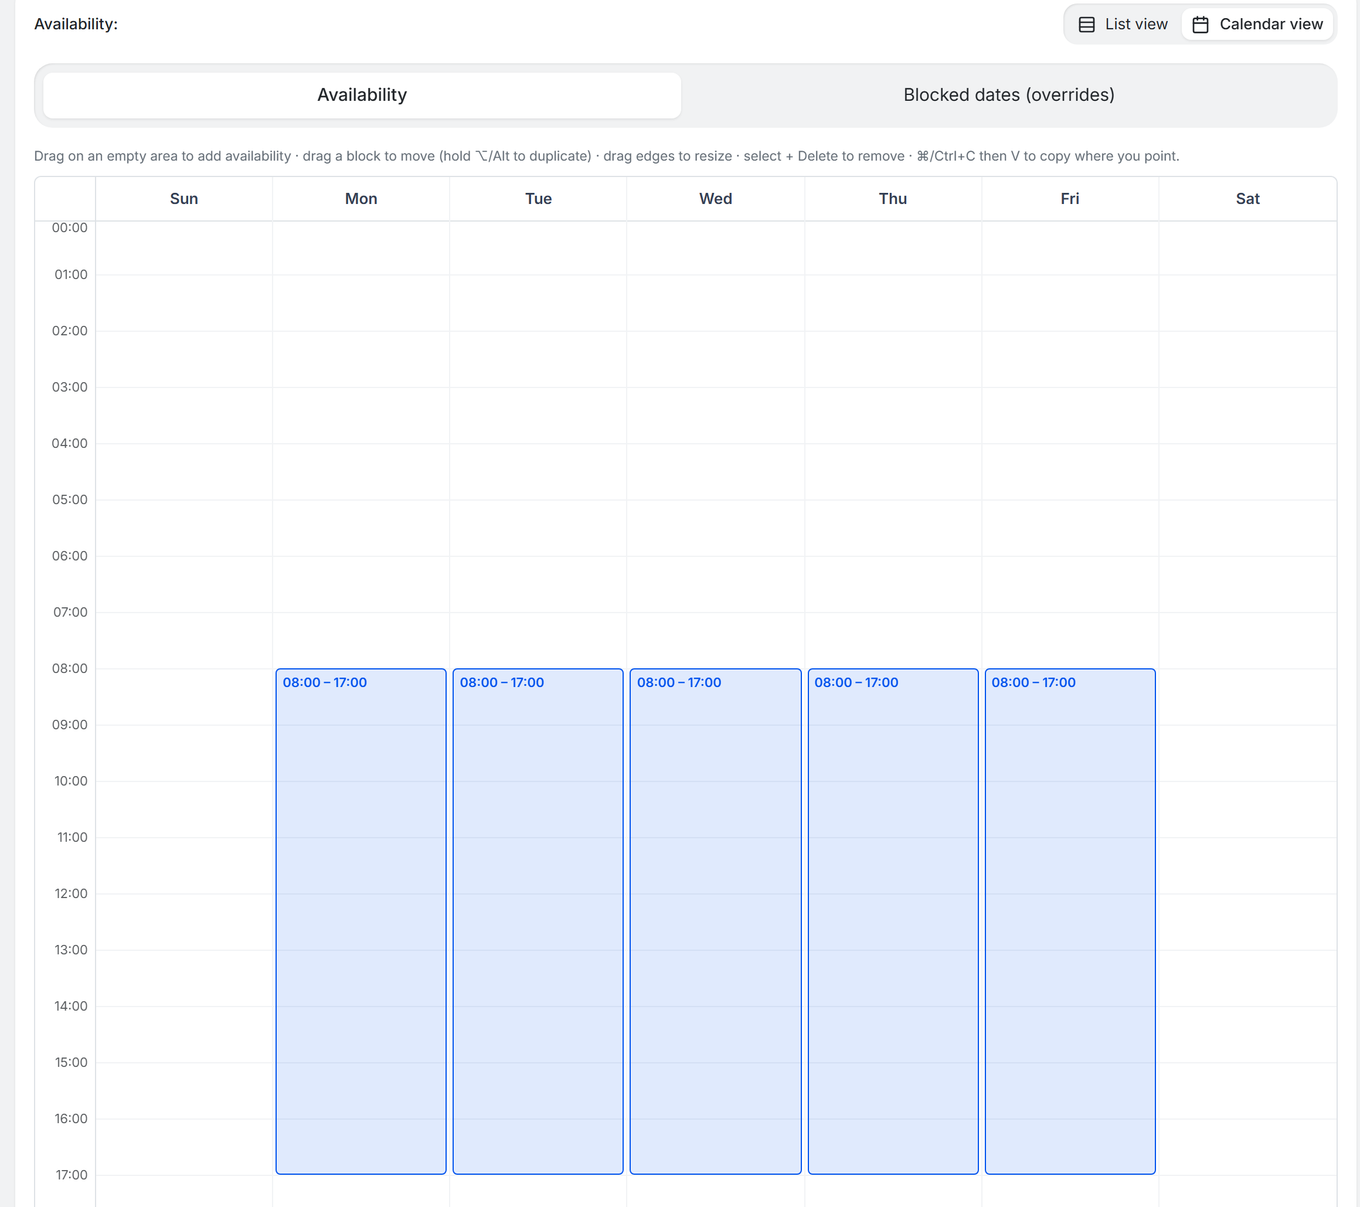
The List view / Calendar view switch sits at the top of the hours card in the editor. Both views edit the same hours and save with the same Save button.
- List view (the default) shows one row per day with hour and minute dropdowns.
- Calendar view shows a weekly grid. Drag on an empty area to add hours, drag a block to move it, drag its edges to resize it, or select it and press Delete to remove it.
- In Calendar view, switch the grid to Blocked dates (overrides) to drag blocked time onto real dates. Your weekly hours show dimmed behind them, and busy events from your connected calendars appear on the grid so you can spot conflicts.
- The Available dates (overrides) card stays below the hours in both views.
How do I set a default schedule?
Your default schedule is the one booking types use when they have no hours of their own and no other schedule selected. It shows a blue Default badge, and you always have exactly one.
- Click the three-dot menu on the schedule you want as the default.
- Select Set as default. The page reloads and the Default badge moves to that schedule.
A booking type that already has a specific schedule selected keeps that schedule when you change the default. To check, open the booking type’s Availability section and look at Select availability schedule.
How do I duplicate a schedule?
- Click the three-dot menu on the schedule you want to copy.
- Select Duplicate.
TidyCal creates a copy named after the original with “(Copy)” added, containing the same weekly hours and date overrides. Rename the copy before you duplicate the same schedule again, because schedule names must be unique.
How do I delete a schedule?
- Click the three-dot menu on the schedule you want to remove.
- Select Delete.
- Confirm the prompt: Are you sure you want to delete "[schedule name]"? Booking types using this schedule will fall back to the default.
- The default schedule has no Delete option. To replace it, set another schedule as default first, then delete the old one.
- Booking types that used the deleted schedule switch to your default schedule.
How do I assign a schedule to a booking type?
- Click Booking types in the sidebar and open the booking type.
- Click Availability in the editor.
- Turn on Use an availability schedule.
- Choose a schedule in Select availability schedule. A preview of its hours appears below, with a Manage availability schedules link.
- Click Save.
TidyCal picks a booking type’s hours in this order:
- The booking type’s own hours: with Use an availability schedule. turned off, you set weekly hours, specific dates and date overrides directly on the booking type.
- The selected schedule: the schedule chosen in Select availability schedule.
- Your default schedule: used when neither of the above is set.
Collective and Round Robin team booking types (available on Pro and Agency Lifetime) have no Availability section. Instead, choose a schedule for each selected host in the booking type’s Team section; each host’s default schedule is preselected. See team booking types for setup.
What is the difference between weekly hours and date overrides?
Weekly hours repeat every week. Date overrides change only the dates you choose and leave your weekly hours untouched.
Weekly hours (recurring)
Weekly hours are your regular business hours, repeated every week. For example:
- Monday–Friday: 9:00am – 5:00pm
- Saturday: 10:00am – 2:00pm
- Sunday: Unavailable
You can add multiple time windows per day, for example around a lunch break:
- Monday: 9:00am – 12:00pm and 1:00pm – 5:00pm
For a step-by-step walkthrough, see different availability for each day of the week.
How do date overrides work?
Below your weekly hours, the editor has two override cards:
- Blocked dates (overrides) removes time on the dates you choose, either the whole day or part of it.
- Available dates (overrides): “Open extra times on a date your weekly hours do not cover.”
Available dates add to your weekly hours on that date; they do not replace them. Blocked time always wins: if a blocked window overlaps hours you opened, that time stays unavailable.
How do I block off dates?
- In Blocked dates (overrides), click Add blocked dates.
- In the calendar, click a day to select it, then click a second day to select the whole range between them. Keep clicking to add more days or ranges, then click Apply.
- The dates are blocked all day (Unavailable all day). To block only part of a day, turn off Block all day and set the time window to block. Click New window to block another window on the same dates.
- Click Save.
Consecutive dates with the same hours show as one range, such as Jul 10, 2026 → Jul 24, 2026. Click a range to change its dates, or click its X to remove it. Dates that have passed move to View past dates in the same card, where you can clear a single range or click Clear all past dates, then click Save.
To shorten your hours on one date, block the part of the day you do not want. For example, if your weekly hours are 9:00am – 5:00pm and you only want to work the morning of December 24, block 12:00pm – 5:00pm on that date.
How do I add extra hours on a specific date?
- In Available dates (overrides), click Add available dates.
- Pick the dates the same way and click Apply.
- Each date starts with 9:00am – 5:00pm. Change the times, or click New window to add another window.
- Click Save.
For example, if your weekly hours leave Saturdays off, add one Saturday with 10:00am – 2:00pm to open just that day.
How do I make a schedule bookable only on specific dates?
Under Availability type, choose Specific dates. Click Add available dates, pick the dates, set your hours and click Save. The schedule is then bookable only on the dates you add; weekly hours and blocked dates do not apply. You can switch between Weekly and Specific dates without losing your work, but Save keeps only the type that is selected.
When should I use multiple schedules?
- Seasonal hours: create Summer Hours and Winter Hours schedules and switch booking types between them in Select availability schedule.
- Service-specific hours: a Consultations schedule for weekday mornings and a Quick Calls schedule for weekday afternoons.
- Part-time schedules: Full Days for your main booking types and Half Days for lower-priority ones.
- Client-type schedules: separate hours for new and existing clients, each assigned to its own booking type.
Troubleshooting
If these checks do not solve it, email support@tidycal.com with a link to the booking type.
Why does my booking page show no available dates?
- If the booking type editor shows You have no availability windows enabled, so no time slots are available., the booking type’s own hours have every day off. Open its Availability section and turn on a day, add available dates, or turn on Use an availability schedule.
- Check that the schedule has at least one day with hours or at least one available date. Saving a schedule with nothing in it shows At least one availability window is required.
- Make each time window at least as long as the booking type’s duration. A 60-minute booking type needs a window of at least 60 minutes.
- Look for blocked dates, busy calendar events and booking type restrictions covering those times.
- Open your booking page while logged in and click Troubleshoot availability to see why each slot is unavailable; time removed by a blocked date shows a SCHEDULE badge. Fixing missing dates in TidyCal explains the troubleshooter, including per-host results for team booking types.
Why is a booking type using the wrong schedule?
Open the booking type’s Availability section. If Use an availability schedule. is off, the booking type uses its own hours, not a schedule. If it is on, Select availability schedule shows the schedule in use. Collective and Round Robin booking types use the schedule chosen for each host in the Team section.
Why can’t I delete a schedule?
The default schedule has no Delete option. Set another schedule as default, then delete the old one.
Why do I see “The name has already been taken.”?
Schedule names must be unique in your account, so choose a different name. Duplicating a schedule whose “(Copy)” already exists does not create another copy: rename the earlier “(Copy)” schedule, then duplicate again.
Why won’t my schedule save (“must end after it starts”)?
Every time window has to end after it starts. Save checks every window in the schedule, including dates you never opened, so one old entry, such as a past date under View past dates, can block the whole save. A red message names the window, and nothing is saved until you fix it:
- Weekly hours: Your Monday hours (8:00 AM to 12:00 AM) must end after they start. Change the end time, then save. Change that day’s end time and click Save. An end time of 12:00 AM counts as ending before the start, so pick an end time later than the start on the same day.
- Blocked or available dates: The blocked date Thu, Dec 5, 2024 (10:00 PM to 9:00 PM) must end after it starts. Remove it, then save. If it isn't in your list, it's under View past dates. Switch to List view, find the date under Blocked dates (overrides) or Available dates (overrides) and click its X. If the date has passed, click View past dates and click the X next to it (or Clear all past dates). Then click Save.
The booking type editor shows the same messages when the booking type’s own hours (Use an availability schedule. turned off) contain such a window. Fix it the same way in the booking type’s Availability section.
Frequently Asked Questions
Is there a limit on how many availability schedules I can create?
No. Every plan, including the Free Plan, can create unlimited availability schedules. The Availability page shows them 20 per page.
Does my connected calendar override my availability schedule?
Yes. A busy event on a calendar with Reading enabled blocks that time even inside your schedule’s hours, while events marked Free do not block. Calendar changes sync in the background, so a new event can take a few minutes to take effect. See troubleshooting undetected calendar events.
What is the default schedule (Default Availability)?
The default schedule is the one booking types use when they have no hours of their own and no other schedule selected. You always have exactly one, marked with a blue Default badge, and it cannot be deleted while it is the default.
How does availability work for team booking types?
Team availability is checked host by host, using each host’s own schedule, timezone, calendar events and bookings. A Collective slot needs every selected host free; a Round Robin slot needs at least one. Choose each host’s schedule in the booking type’s Team section. Collective and Round Robin booking types are available on Pro and Agency Lifetime.