
How to Create and Manage Booking Types in TidyCal
A booking type is a bookable meeting with its own link, duration, availability and price. Create unlimited booking types on any plan, including the Free Plan.
What Is a Booking Type?
Each booking type is one thing clients can book with you, such as a 30-minute call, a paid consultation or a weekly class. Open Booking types in the sidebar (under Scheduling) to see yours and create new ones. There is no limit on how many you create, on any plan.
Click a booking type to open its editor. The left menu has Basics, Availability, Restrictions and Pricing & Subscriptions, a Packages & Recurring section on booking types that already repeat on a schedule, a Team section on team booking types, and an Advanced group with Calendar, Groups & Guests, Questions, Notifications, Visibility and an Appearance link to the booking page theme editor. Availability is hidden on Collective and Round Robin team booking types, and Packages & Recurring is never shown on subscription booking types. Click Save when you are done.

Managing Your Booking Types List
The Booking types page shows each booking type as a card. Use the search box to find one by name, and the All / Active / Inactive tabs to filter by state. If you belong to a team, buttons above the list switch between your own booking types and each team's.
On Individual Lifetime and Agency Lifetime accounts without a Pro subscription, an alert above the list reads "Remove TidyCal branding from your booking pages." (Agency Lifetime: "Remove TidyCal branding across all your team's booking pages.") with an Upgrade to Pro button. Pro is the plan that removes TidyCal branding from booking pages.
What Do the Badges on Each Card Mean?
Badges summarize each booking type's setup and appear only when the setting is active:
- Duration (e.g., 15 minutes, 1 hour) — shown on every card
- Price (e.g., $60.00) — shown when a price is set
- Subscription — shown on subscription booking types
- Repeat frequency (e.g., Weekly) — shown on recurring booking types; package booking types show the number of sessions instead (e.g., 8 sessions)
- Private — shown when the booking type is hidden from your public booking page
- Seats (e.g., 10 seats) — shown on group booking types
- Managed / Round Robin / Collective — shown on team booking types
- Rating (e.g., 4.5 (23)) — shown once the booking type has reviews; click it to open the reviews
How Do I Reorder Booking Types?
Booking types appear on your public booking page in the order of this list. Use the Move up and Move down arrows on the left edge of a card, or choose Move up or Move down in its three-dot (⋮) menu. Changes save automatically.
Enabling and Disabling
Each card has an Enabled toggle. A disabled booking type is hidden from your booking page and can't be booked, even from its direct link.
Card Actions
- Copy link (link icon) — copies the booking type's public link
- View booking page (external link icon) — opens the booking page in a new tab
- Share (share icon) — opens a menu with Copy link, Copy single-use link, Email, X (Twitter), LinkedIn and Copy review link. Email opens a message in your own email app, and X (Twitter) and LinkedIn open that network's share window. Copy single-use link makes a link that works for one booking. It is free for every account until December 5, 2026, then needs Pro (a new account also gets it free for its first 30 days; Individual Lifetime and Agency Lifetime on their own do not include it). See Single-Use Booking Links.
- More options (⋮) — Edit, Clone, Reviews, Move up, Move down, Embed on website, Embed in email, Email signature and Delete. Embed in email is not offered on package or recurring booking types.
What Happens When I Delete a Booking Type?
Choose Delete in the three-dot menu and confirm. The booking type stops accepting new bookings, but existing bookings stay: clients can still view and cancel them, and they can no longer be rescheduled. Team members' copies of a Team Managed booking type can't be deleted on their own.
Subscription Booking Types Require Stripe
A subscription booking type can only be enabled after you connect Stripe. Until then, its card shows "Connect Stripe to enable this subscription booking type." with a Connect Stripe link that starts the Stripe connection. See Subscriptions - Recurring Payments with Booking Credits.
Your First Booking Type
Every account starts with three booking types: 15 Minute Meeting, 30 Minute Meeting and 60 Minute Meeting. Edit them, rename them or delete the ones you do not need. On the Free Plan they have no location; on a paid plan they use a Google Meet or Microsoft Teams link when you have connected one. If you delete all of them, the page shows "Create a booking type to start accepting bookings!" Click New booking type to get started.
How Do I Create a Booking Type?
- Go to Booking types and click New booking type. The button itself starts a 1:1 booking type.
- To start from a different preset, click the arrow next to New booking type (More booking types) and pick one from the menu. The editor opens with that preset's settings filled in.
- Enter an Event title, adjust the settings described below, and click Save.
A new booking type starts with Per booking pricing once you have connected a payment service, and as a free booking type until then. To change it, open Pricing & Subscriptions and choose Free, Per booking, Subscription or Package.
| Preset | Menu description | Starts with | Plan |
|---|---|---|---|
| 1:1 | One-on-one meetings (default) | One attendee per time slot | All plans |
| Group | Several people book the same time | 10 seats, 60 minutes | All plans |
| Round robin | Spread bookings across your team | A Round Robin team booking type (offered only on a team's list) | Pro, Agency Lifetime |
| Package | Multiple sessions — free or paid | Clients pick up to 8 dates | All plans |
| Subscription | Clients pay monthly and get a set number of bookings | Subscription pricing (requires Stripe) | All plans |
The first time you save a new booking type, a window titled [Event title] is live shows its booking link with Copy link, a single-use link option, Email, X and LinkedIn sharing, View booking page and Done. Later saves show Booking type saved successfully!
Basic Settings

The Basics section holds the details clients see first.
Title
Event title is the name of the booking type on your booking page.
URL
URL sets the end of this booking type's link. The link starts with tidycal.com/ and your username (team booking types use team/ and the team's URL). To change your username, go to Booking page and click the Classic card to open its settings. See How to customize your profile and booking page URL.
Description
Description appears on the booking page. To add a hyperlink, highlight text, click the link icon in the editor toolbar and enter the URL. Once you have entered an Event title, Generate with AI drafts a description for you; AI features are available on Individual Lifetime, Pro and Agency Lifetime. See How to Write Booking Type Descriptions and Questions with AI.
Duration
Pick 15 min, 30 min, 45 min or 60 min, or click Custom and enter any number of minutes. New booking types start at 30 minutes.
Location
Choose where the meeting takes place:
- Google Meet, Microsoft Teams or Zoom — TidyCal creates the meeting link automatically on Individual Lifetime, Pro and Agency Lifetime once the service is connected in Integrations. On the Free Plan these options are locked and marked Requires a paid plan.
- Custom video link — paste a link from any other video service
- Phone number — enter the phone number for the call
- In person/Custom location — an address or other meeting details
- None — no location. This is the default on the Free Plan, and on a paid plan until you connect a video service. Once you have, new booking types start with the first one you connected (Zoom, then Microsoft Teams, then Google Meet), and you can change it
On Individual Lifetime, Pro and Agency Lifetime, click Add another location to let clients choose between several. See How to Set Up Location Selections.
Select a Calendar
In Advanced → Calendar, choose which connected calendar new bookings are added to, or leave -- Use primary calendar --. Choosing a calendar per booking type requires Individual Lifetime, Pro or Agency Lifetime; on the Free Plan the menu is locked with a Pro badge and bookings go to your primary calendar. Calendars on a disconnected account are listed but can't be selected. On Round Robin booking types, each booking goes to the primary calendar of the host it is assigned to.
How Do I Control When Clients Can Book?

These settings are in the editor's Restrictions section.
Time Slot Intervals
Time slot intervals every [N] Minutes/Hours sets how often start times are offered on the booking page, for example every 15 or every 30 minutes. The shortest interval is 15 minutes.
How Do I Add Buffer Time Between Bookings?
Add a [N] minute gap between bookings. keeps buffer time around each booking so meetings aren't back-to-back. See Can I prevent clients from booking me back-to-back?
How Far in Advance Can Clients Book?
Allow bookings [N] days ahead. sets how many days into the future your calendar is open for bookings. The default is 60 days.
How Do I Prevent Last-Minute Bookings?
Require at least [N] notice. (in minutes, hours or days) sets the minimum notice before a booking can start. The default is 2 hours, so the first available slot is at least 2 hours from the current time. See How can I prevent last-minute bookings?
Booking Limits
Turn on Set maximum bookings. and set Limit to [N] bookings every day, every week, every month or in total. Booking limits require Individual Lifetime, Pro or Agency Lifetime; on the Free Plan the toggle is greyed out with a Pro badge. See How to Set Booking Limits.
One Booking per Email Address
Turn on Limit to one booking per email address. to let each email address book this booking type only once, which suits a free first session. Under Send repeat bookers to, choose another of your own booking types, such as a paid session, or leave Nowhere, just tell them. Someone who has already booked sees “This email address has already booked this. It can only be booked once per person.”, followed by a Book [booking type] instead link when you chose one; picking several times in one booking is refused too. Cancelled bookings, guests added to someone else's booking and bookings still waiting for payment do not count, so a booker who cancels can book again. You can still book the same person again yourself, and a booking invite you send is not blocked. This setting has no plan requirement. It is not offered on date polls, recurring bookings or packages, and team booking types have no Send repeat bookers to choice. See How to Set Booking Limits for caps on how many bookings a type accepts.
Allow Rescheduling
Control whether clients can reschedule this booking type. Turn off Allow rescheduling. to stop clients from rescheduling, or keep it on and set Allow rescheduling up to a number of hours or days before the booking. as a cutoff (leave it empty to allow rescheduling any time before the booking starts). When rescheduling is off or past the cutoff, the reschedule option is removed from the client's confirmation page and email. On one-to-one booking types, a reschedule link in the calendar event stays, but it opens the confirmation page instead. Requires Individual Lifetime, Pro or Agency Lifetime; on the Free Plan, clients can always reschedule. See How do I reschedule a booking?
Allow Cancellations
Control whether clients can cancel this booking type. Turn off Allow cancellations. to stop clients from cancelling themselves, or leave it on (the default) to let them cancel any time before the booking starts. When cancellations are off, the cancel option is removed from the client's confirmation page, their booking emails and the reschedule page. Signed-in hosts keep the cancel option on the reschedule page, so you can still cancel on a client's behalf from the link in your own booking emails. Requires Individual Lifetime, Pro or Agency Lifetime; on the Free Plan, clients can always cancel.
On a paid booking type that uses Stripe, Charge a cancellation or no-show fee of sets a flat amount charged to the card on file when a client cancels or when you mark them as a no-show. The same fee covers both, and a booking is charged at most once. See Cancellation and No-Show Fees.
Look Busy
Choose a level under Look busy to hide some of your open times from bookers so your calendar looks in demand: Kinda busy (1 in 10 hidden), Pretty busy (1 in 5 hidden) or Slammed (1 in 3 hidden). The same times stay hidden for every visitor, each day that has open time still shows at least one, and you can still book any time yourself. It is not offered on date polls or on recurring and package booking types.
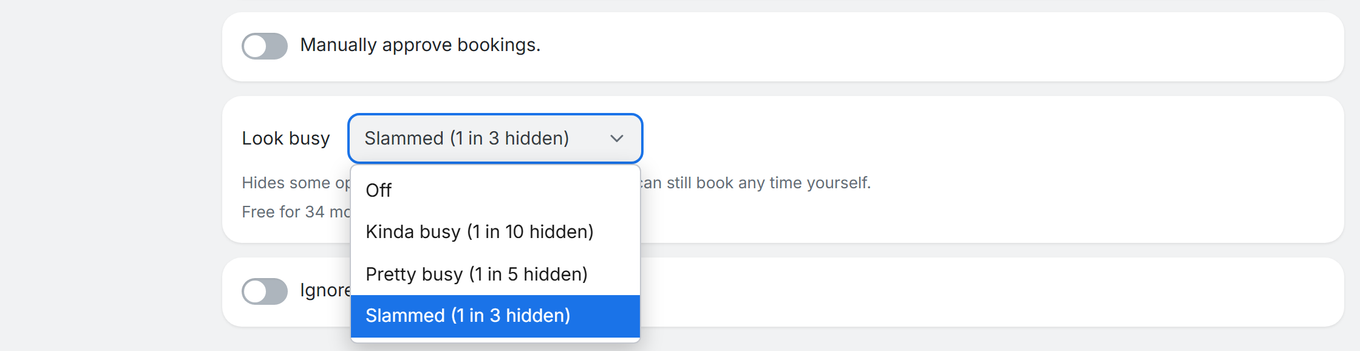
Plan required: Look busy is free for every account until December 5, 2026, then needs Pro (a new account also gets it free for its first 30 days; Individual Lifetime and Agency Lifetime on their own do not include it). See Look Busy.
Ignore External Calendar Conflicts
Turn on Ignore external calendar conflicts. to offer times even when your connected calendar has an event then, which helps if you block personal time on your calendar but still want to accept bookings. With it on, events on your connected calendars and bookings on your other booking types don't block this booking type; only its own bookings do.
Plan required: None. Ignore external calendar conflicts is available on all plans, including the Free Plan.
How Do I Set Availability for a Booking Type?

Use a Schedule or Custom Hours
New booking types have Use an availability schedule. turned on. Pick a schedule under Select availability schedule (your default schedule is marked (Default)), and edit your schedules with Manage availability schedules or from Availability in the sidebar. New booking types are linked to your default schedule, so later edits to it apply to them. Turn the toggle off to give this booking type its own hours. See Availability Schedules in TidyCal.
Booking Schedule
With the toggle off, choose an Availability type:
- Weekly - hours that repeat every week.
- Specific dates - only the dates and times you add.
Fixed Booking Slots
Click New window to add another block of hours to a day, for example separate morning and afternoon windows instead of one continuous stretch.
How Do I Block Dates or Add Extra Hours?
On a Weekly schedule, use Blocked dates (overrides) to take time off. Click Add blocked dates, then use the Single days / Date range switch to pick dates one at a time or as a range (blocked dates open in Date range: click the first day, then the last), and click Apply. Blocked dates are unavailable all day by default, or turn off Block all day to block only certain hours.
To open time your weekly hours don't cover, use Available dates (overrides) and click Add available dates. This one opens in Single days: click each day you want, and click a selected day again to remove it. See Availability Schedules for the full walkthrough of both.
Group Bookings
Group bookings let several people book the same time slot separately, which suits classes, webinars and workshops. Group bookings are available on every plan, including the Free Plan. See Group Bookings: Run a Class or Workshop for a full walkthrough.
How to Enable Group Bookings
- Go to Booking types and click the booking type to open it
- In the editor's left menu, expand Advanced, then click Groups & Guests
- Turn on Allow group bookings.
- Set Max attendees per slot (2 to 10,000)
- (Optional) Tick Show remaining seats to bookers
- Click Save
Important Notes
- Each attendee makes their own separate booking (unlike Guest Invites, where one booker brings others)
- Once every seat is taken, the time slot is no longer offered; if every time in your booking window is full, bookers see the waitlist form unless you switch it off
- Each attendee receives their own confirmation email from TidyCal
- On a paid booking type, each attendee pays separately when they book
Managing a Group Slot
In Bookings, a time slot with two or more bookings shows as one group card. Open its More options menu to use Copy all emails (to write to everyone in the slot), Reschedule all bookings (to move the whole group to a new time) or Cancel all [N] bookings. See How do I reschedule a booking? for rescheduling.
Guest Invites
Guest Invites let one booker add other people to their booking, and are available on all plans, including the Free Plan. They differ from Group Bookings, where separate people each book the same slot.
On the booking form, after entering their own name and email, the booker clicks + Invite guests and enters their guests' email addresses before confirming.
How to Enable Guest Invites
- Go to Booking types and click the booking type to open it
- In the editor's left menu, expand Advanced, then click Groups & Guests
- Turn on Allow attendees to bring guests.
- Set Max guests per attendee (up to 10)
- Click Save
Not offered on recurring booking types: even with the setting on, bookers of a recurring booking type don't see + Invite guests.

Paid booking types: invited guests are added free of charge. Only the booker pays, and they pay the normal price once.
Guest Invites are added by the booker. To start a booking for a client yourself, see Create a Booking on Behalf of a Guest.
How Do I Charge for a Booking Type?

You can take payment for bookings through Stripe or PayPal on all plans. Connect your payment account first at Integrations → Payments; see Connect your Payment Services.
- Open the booking type and click Pricing & Subscriptions
- Select Per booking
- Set Charge [currency] [price] per booking. Currencies display as code and symbol, for example USD ($) or EUR (€)
- Under Payment platform:, choose Stripe or PayPal
- Click Save
Stripe payments carry a 1% platform fee on the Free Plan, Individual Lifetime and Agency Lifetime, and no platform fee on Pro; PayPal payments carry no platform fee. See platform fee details for who pays the fee and every exception, and How to Charge for Appointments with Paid Bookings for a full walkthrough.
To let clients use coupon codes, turn on Allow coupons on this booking type. TidyCal then notes that All active coupons will apply. — there is no per-booking-type coupon picker. Which booking types each coupon covers is set on the coupon itself; click Manage coupons to open the Coupons page.
To charge a recurring subscription with booking credits instead, select Subscription. Subscriptions require Stripe as a payment platform. To sell several sessions together, select Package (see Packages and Recurring Bookings below).
Add-ons (Sell Store Products at Checkout)
If your booking type charges through Stripe, you can offer up to 3 products from your TidyCal store as optional add-ons that bookers can add during checkout.
In the booking type editor, open Pricing & Subscriptions. Once you have published store products that use the same payment provider (Stripe) as the booking type, the Add-ons picker lets you choose and reorder up to three. Add-ons are not available on PayPal booking types.
Products are created in your TidyCal Store, opened from the TidyCal logo dropdown at the top-left of the sidebar. Each add-on must be a published product that is ready to accept Stripe payments. Add-ons are available on all plans. See Digital Storefront.
How Do I Add Custom Intake Questions?
In Advanced → Questions, turn on Enable questions to attendees. to collect information from bookers. Question types: Short text, Long text, Single choice, Multiple choice, Dropdown, Date and Phone number. Tick Required to make an answer mandatory, and click Add another question for more.
Plan required: None. Custom intake questions are available on all plans, including the Free Plan. Generate questions with AI is available on Individual Lifetime, Pro and Agency Lifetime. See How do I set up custom intake form questions?
Email Reminders
On every plan, each booking type emails the booker a reminder 1 day and 1 hour before the booking.
On Individual Lifetime, Pro and Agency Lifetime, turn on Enable custom email reminders in Advanced → Notifications to choose up to two reminder times (from 15 minutes to 1 week before) and write your own subject and message. See How to Customize Email Reminder Timing and Content.
Booking confirmations: when new bookings are added to a connected Google or Microsoft calendar, the booker's confirmation is that calendar's invitation. TidyCal emails its own confirmation instead when you have no connected calendar, the calendar is Apple or needs reconnecting, the booking type takes group bookings, or Confirmation method: is set to Email confirmation (Individual Lifetime, Pro and Agency Lifetime).
SMS reminders are available on Pro and Agency Lifetime. See How to Set Up SMS Reminders.
Automated Post-Booking Emails
Send automated emails before or after bookings. Create up to 3 automated emails per account with their own timing, subject and content, and manage them from Emails in the sidebar (under Marketing). In a booking type's Advanced → Notifications, the Automated emails list lets you switch any of them off for that booking type only. Available on all plans. See Automated Post-Booking Emails for details.
Redirect After Booking
In Advanced → Notifications, turn on Redirect to custom page after booking and enter the URL to send bookers to once they book, such as a thank-you page or a page that records conversions.
Plan required: Individual Lifetime, Pro or Agency Lifetime. See How to redirect clients to a custom URL after booking.
Tracking and Analytics
Track booking page conversions with Google Analytics (GA4) or Google Tag Manager (GTM) from Integrations → Analytics. The same page connects the TikTok Events API, which receives a server-side Schedule event for each booking so you can measure conversions from TikTok ads.
To add other tracking pixels (for example Meta Pixel or Google Ads), load them through Google Tag Manager, or use Redirect to custom page after booking to send bookers to a page that carries them.
Plan required: Individual Lifetime, Pro or Agency Lifetime. See Google Analytics (GA4) & Google Tag Manager (GTM) for setup details.
Require Approval
Turn on Manually approve bookings. in Restrictions to review bookings before they are confirmed. New bookings then wait as pending until you approve or reject them.
Plan required: Individual Lifetime, Pro or Agency Lifetime. On the Free Plan the toggle is greyed out with a Pro badge.
See Booking Approval Workflow for details.
Packages and Recurring Bookings
Sell several sessions together, for coaching series, consultation packages or regular appointments. Packages are available on all plans, including the Free Plan.
Open the booking type, click Pricing & Subscriptions and select Package. Then answer When do clients choose their dates?
- Choose all dates at checkout: clients choose their session dates together. Offer them free or collect payment at checkout.
- Book sessions later: clients pay once, then use credits to book sessions before they expire.

Choose all dates at checkout
Set Clients select [exactly / up to] [N] bookings. Clients pick their own dates within your availability. Under Payment, choose Free or Paid. For Paid, set Charge [currency] [price] per session, paid together at checkout. and choose the payment platform.
Book sessions later

Clients pay once and receive credits, then book each session before the credits expire. Set:
- Sell [N] sessions for [currency] [price]: the number of sessions and the one-time price.
- Credits expire after [N] days after purchase (default: 90).
Booking sessions later requires Stripe: the editor shows Booking sessions later requires Stripe. TidyCal does not refund unused sessions automatically; the editor notes Buyers pay once. Unused sessions are not refunded automatically; refund them in Stripe.
About 14 days before a package's credits expire, TidyCal emails the buyer once, as long as they still have a session left to book. For a package that lasts less than 28 days, the reminder goes out halfway through instead.
Recurring
The New booking type menu has no Recurring preset. Booking types that already repeat on a schedule keep a Packages & Recurring section in the editor, where clients choose which day(s) of the week they want and the bookings repeat automatically. The section shows This event repeats [N] time(s) every [N] week(s), month(s) or year(s) and End series after [N] bookings. For monthly series, you can also pick On the [any week / 1st / 2nd / 3rd / 4th / last] occurrence each month. On a paid booking type, payment is collected before each session via Stripe. See How to Set Up Recurring Bookings and Packages.
Managing Package Bookings
- Reschedule individual dates: each date on the confirmation page (opened from the link in the confirmation email) has its own Reschedule button
- Cancel individual dates: clients can cancel one date without cancelling the rest
- Both buttons follow the booking type's Allow rescheduling. and Allow cancellations. settings
- Track cancellations: cancelled dates are marked Cancelled and shown with strikethrough text on the confirmation page
Team Booking Types (Collective, Round Robin and Team Managed)
Team booking types let several team members host one booking type. They need a team whose owner is on Pro or Agency Lifetime; if the team owner's plan doesn't include team booking types, the team's public booking pages are turned off.
How to Set Up Team Bookings
- Go to Teams, create a team and invite members (creating a team requires Pro or Agency Lifetime)
- Go to Booking types and select the team in the buttons above the list
- Click the arrow next to New booking type and pick Round robin (offered only on a team's list)
- In the editor's Team section, set Team booking type: to Collective, Round Robin or Team Managed
- Under Select team members:, tick the hosts and click Save
Learn more: Teams Feature Guide | Set Up Collective, Round Robin and Managed Booking Types
Collective Meetings
A time slot is offered only when all selected hosts are available, and all hosts attend the same meeting. Best for partner meetings, panel interviews and team consultations.
Round Robin
A slot is offered when at least one selected host is free. Each booking goes to one free host: the one with the highest priority, with ties broken at random. Set each host's priority (Highest priority, High priority, Medium priority, Low priority or Lowest priority) next to their name in the Team section. Best for sales teams, support rotations and one-host meetings. See How to Create a Round-Robin Booking Type.
Team Managed
Team members manage their own availability and bookings: each selected member gets their own copy of the booking type and sets their own availability on it.
How Is Each Host's Availability Checked?
Collective and Round Robin booking types have no Availability section of their own. For each selected host, TidyCal combines:
- The availability schedule chosen for that host in the Team section, or their default schedule if none is chosen, in the host's own time zone.
- Busy events on their connected calendar(s).
- Their existing TidyCal bookings.
- The booking type's Restrictions (notice, gap between bookings and booking limits), which apply to all hosts.
Collective offers a slot only when every selected host is free. Round Robin offers it when at least one host is free, then picks the host by priority.
If Ignore external calendar conflicts. is on, it applies to every host on the booking type: calendar events and bookings on other booking types are skipped, and only existing bookings on this booking type block a host.
For host schedules, see Availability Schedules.
Additional Options
Private Mode
In Advanced → Visibility, turn on Hide from public profile; share via direct link only. Private booking types are hidden from your public booking page, but anyone with the direct link can still book them.
Display in the Public TidyCal Directory
New booking types start with Display in the public TidyCal Directory. (in Advanced → Visibility) turned on, which lists them in the TidyCal Directory. Choose a Directory category to help people find it, or turn the toggle off to keep the booking type out; existing booking types keep their current setting. A listing appears once the booking type is enabled and public, has your own title or description rather than the starter text, your account is at least 14 days old and you have had at least one booking from someone other than yourself. Available on all plans. See TidyCal Directory.
Waitlist
When a booking type has no open times, its booking page shows Fully booked. Join the waitlist, where a booker can leave their name and email. Show a waitlist when there are no open times. in Advanced → Visibility controls it, and it is on by default. People who join appear in Contacts under the Waitlist tab and you get an email for each one; TidyCal does not email them, so write to them yourself when you open new times. See Waitlist.

CC Email Addresses
In Advanced → Notifications, turn on CC your team on booking notifications to send copies of booking notifications to additional email addresses. Requires Individual Lifetime, Pro or Agency Lifetime. See How to Add CC Email Addresses.
Custom Reply-To Address
Turn on Set custom reply-to address (in Advanced → Notifications) to choose the address that replies to booking notifications go to. Requires Individual Lifetime, Pro or Agency Lifetime. See How to Set Custom Reply-To Email Addresses.
What Your Client Sees
A booking type's link opens its public booking page, which shows the booking type's title, duration and description, a calendar of available dates, and the open times for the selected date. After picking a time, the client fills in the booking form and confirms. Paid booking types show the price, and recurring booking types use a booking page where clients choose days of the week. On a phone, a simple one-to-one booking page shows a strip of days and a grid of times; group, recurring and team booking pages keep the classic layout.

Which Booking Type Features Need a Paid Plan?
| Feature | Free Plan | Individual Lifetime ($29) | Agency Lifetime ($79) | Pro ($12/mo or $99/yr) |
|---|---|---|---|---|
| Create booking types | Unlimited | Unlimited | Unlimited | Unlimited |
| Paid bookings (Stripe or PayPal) and coupons | ✓ | ✓ | ✓ | ✓ |
| Platform fee on Stripe payments | 1% | 1% | 1% | None |
| Package and recurring bookings | ✓ | ✓ | ✓ | ✓ |
| Subscriptions | ✓ | ✓ | ✓ | ✓ |
| Guest invites | ✓ | ✓ | ✓ | ✓ |
| Custom intake questions | ✓ | ✓ | ✓ | ✓ |
| Ignore external calendar conflicts | ✓ | ✓ | ✓ | ✓ |
| Directory listing | ✓ | ✓ | ✓ | ✓ |
| Group bookings | ✓ | ✓ | ✓ | ✓ |
| Booking limits | ✗ | ✓ | ✓ | ✓ |
| Manual approval | ✗ | ✓ | ✓ | ✓ |
| Reschedule, cancellation & no-show controls | ✗ | ✓ | ✓ | ✓ |
| Custom email reminders and confirmations | ✗ | ✓ | ✓ | ✓ |
| Redirect URL | ✗ | ✓ | ✓ | ✓ |
| CC emails and reply-to email | ✗ | ✓ | ✓ | ✓ |
| Calendar per booking type | ✗ | ✓ | ✓ | ✓ |
| Automatic Zoom, Google Meet and Teams links; multiple locations | ✗ | ✓ | ✓ | ✓ |
| GA4, GTM and TikTok tracking | ✗ | ✓ | ✓ | ✓ |
| AI descriptions and questions | ✗ | ✓ | ✓ | ✓ |
| Team booking types | ✗ | ✗ | ✓ | ✓ |
| SMS reminders | ✗ | ✗ | ✓ | ✓ |
For the full comparison of every plan, see the TidyCal plan comparison.

Website Builder & Date Polls
For a landing page instead of the classic list of booking types, use the Website Builder, which offers 4 themes (Rio, Cairo, Zurich and New York). Your booking page URL stays the same: switch between the Classic and Website cards on Booking page in the sidebar. Available on all plans.
For group scheduling where participants vote on the best time, use Date Polls. Create a poll from the TidyCal logo dropdown > Polls, share the link, and let your group pick the dates that work best. Available on all plans.
Reviews on Booking Pages
Once a booking type has reviews, its star rating and reviews appear on your public booking page while Show reviews on booking page. (in Advanced → Visibility) is on, which it is by default. See Ratings and Reviews for setup instructions.
Troubleshooting
Why Are No Time Slots Showing?
- Check the booking type's availability: its schedule, or its own Weekly or Specific dates hours, including any blocked dates
- In Restrictions, check Allow bookings [N] days ahead. and Require at least [N] notice.
- Events on your connected calendars block those times unless Ignore external calendar conflicts. is on
- Check that the duration fits inside your available hours and that a booking limit hasn't been reached
- If Look busy is on, some open times are hidden from bookers on purpose; set it to Off to show them all
- While signed in, open the booking page and click Troubleshoot availability to see why times are unavailable. See TidyCal Calendar Not Showing Dates for detailed troubleshooting
Why Isn't Payment Appearing for Clients?
- In Pricing & Subscriptions, make sure Per booking is selected and a price is entered
- Make sure a Payment platform is selected and connected. The editor shows Required: Connect your Stripe account. (or PayPal) until it is; connect it at Integrations → Payments
- Subscriptions work only with Stripe
Why Is the Approval Toggle Greyed Out?
- Manually approve bookings. requires Individual Lifetime, Pro or Agency Lifetime. On the Free Plan it is greyed out with a Pro badge, as are booking limits
- The badge reads Pro, but Individual Lifetime and Agency Lifetime unlock these settings too
Still stuck? Email support@tidycal.com and include the booking type's link.
Frequently Asked Questions
How many booking types can I create?
Unlimited, on every plan including the Free Plan.
What is the difference between Group Bookings and Guest Invites?
With Group Bookings, several people each book the same time slot separately; with Guest Invites, one booker adds other people to their own booking. You can turn on both for the same booking type in Advanced → Groups & Guests.
Can I duplicate a booking type?
Yes. Choose Clone in the booking type's three-dot menu to create a copy, named with "(copy)", then check its settings and adjust it. A subscription plan is not copied: TidyCal tells you when you clone, and you can set one up on the copy. On the Free Plan, the copy doesn't keep booking limits.
What are booking type presets?
Presets are starting templates in the menu next to New booking type: 1:1, Group, Package, Round robin (team booking types only) and Subscription. Each fills in common settings that you can change before saving.